Posted
Filed under centos7

CENTOS 6.6 에 NGINX1.8 설치 해서  java 환경 세팅중
502 BAD GATEWay error 가 발생 한다.다음 2 명령어로 깔끔하게 해결 할 수 있다.

나와 같은 에러가 CentOS/RHEL 계열 OS에서 발생한다면 다음 두개의 명령으로 말끔히 해결!

setsebool -P httpd_can_network_connect 1


더욱더 견고하게! fix하고 싶다면...

sed -i s/SELINUX=enforcing/SELINUX=disabled/g /etc/selinux/config

2015/05/20 19:59 2015/05/20 19:59
Posted
Filed under PHP
원문 [http://junhyung2.blogspot.kr/2015/02/centos-vsftpd.html]
 

centos에 vsftpd 설치하기

윈도우에서 리눅스에 파일을 업로드하기 위해서는 리눅스 서버에 ftp를 설치해야 합니다. 그래서 이번에는 파일을 업로드하기 위해서 vsftpd를 설치하도록 하겠습니다. vsftpd는 많은 리눅스 개발 단체에서 기본 ftp 데몬으로 사용하고 있을 정도로 활용성과 보안면에서 뛰어난 데몬이라고 합니다. 
 
vsftpd는 centos 6.6에서 설치했습니다.
 
1. vsftpd 설치하기
 
# yum install -y vsftpd
 
2. vsftpd.conf 설정하기
 
# vi /etc/vsftpd/vsftpd.conf
 
밑에 해당하는 줄을 찾아서 다음과 같이 변경합니다.
 
anonymous_enable=NO  //익명 접속 가능 여부
local_enable=YES  // 로컬 계정 사용자의 접속 허용 여부
write_enable=YES  // write 명령어 허용 여부
local_umask=022  // 로컬 계정 사용자용 umask
xferlog_enable=YES  // 파일 전송 로그 기록 여부
connect_from_port_20=YES  // 20번 포트로 접속 허용 여부
xferlog_file=/var/log/xferlog  // 파일 전송 로그 파일명
xferlog_std_format=YES  // xferlog 표준 포맷으로 로그를 남길지 여부
chroot_local_user=YES  // 사용자의 홈 디렉토리를 변경 제한을 위한 설정
listen=YES  // standalone으로 운영하려면 YES
pam_service_name=vsftpd  // PAM 파일명을 지정
userlist_enable=YES
tcp_wrappers=YES
 
3. 방화벽에 포트 추가
 
# vi /etc/sysconfig/iptables
 
밑의 줄을 추가합니다.
 
-A INPUT -m state --state NEW -m tcp -p tcp --dport 20:21 -j ACCEPT
 
4. 데몬 재시작 및 chkconfig에 등록
 
# /etc/init.d/iptables restart
# /etc/init.d/vsftpd start
# chkconfig vsftpd on
2015/05/14 20:48 2015/05/14 20:48
Posted
Filed under Linux
jobs 명령어, 리눅스

shell> ctrl + z 

- 현재 보던 창이 닫힌다.


shell> jobs 

- 작업중인 목록이 보인다.


shell> fg

- 가장 최근에 편집한 파일이 열린다.


shell> fg [n]

- jobs 명령을 내렸을 때 보였던 작업번호를 치면, 해당 작업이 수행된다.


shell> kill %n

- n번 작업 삭제

2015/05/09 17:25 2015/05/09 17:25
Posted
Filed under Mysql
mysql> set global max_connections=300;
(mysql 을 재시작 안해도 max_connections 값이 바로 적용된다.)
또 다른 방법으로
mysql 설정파일(my.ini 또는 my.cnf )을 다음과 같이 설정해주면 된다.
[mysqld]
  max_connections = 300
설정파일 변경 후에는 mysql 재시작이 필요하다.

■ max_connections에 대한 설명
MySQL은 [ 최대 접속수 + 1 ]의 접속을 허용한다. "1"은 관리자 권한 접속을 나타낸다.
문제가 발생했을 경우 관리자가 접속할 수 있게 하기 위해서이다.

시스템에 접속수가 폭주해서 접속이 안되는 경우가 발생한다. (ERROR 1040 (08004): Too many connections)
이런 상황에서 일시적으로 접속수를 증가시킴으로써 에러를 해결하자~.

■ MySQL 접속수 관련 상태를 확인하는 방법
mysql> show variables like '%max_connect%';    
+--------------------+-------+
| Variable_name      | Value |
+--------------------+-------+
| max_connect_errors | 10000 |
| max_connections    | 100   |
+--------------------+-------+

mysql> show status like '%CONNECT%';
+--------------------------+-------+
| Variable_name            | Value |
+--------------------------+-------+
| Aborted_connects         | 200   |
| Connections              | 300   |
| Max_used_connections     | 101   |   ==> 현재 연결된 접속수
| Ssl_client_connects      | 0     |
| Ssl_connect_renegotiates | 0     |
| Ssl_finished_connects    | 0     |
| Threads_connected        | 101   |   ==> 연결되었던 최대 접속수
+--------------------------+-------+
7 rows in set (0.00 sec)

mysqladmin 실행해서 확인하는 방법
./mysqladmin -u root -p processlist
./mysqladmin -u  root -p variables | grep max_connections
2015/05/09 17:07 2015/05/09 17:07
Posted
Filed under JSP, JAVA
두가지 경우 모두 maven dependency를 등록해주면 된다.
 
프로젝트 >> properties >> Deployment Assembly를 선택한 후,
"Add" >> Java Build Path Entries >> Maven Dependencies 선택한 후, "Apply"를 해준다.


그래도 에러가 사라지지 않는다면

에러코드를 마우스 오른쪽 버튼 누르고 삭제 하면 해결됨
2015/05/08 11:45 2015/05/08 11:45
Posted
Filed under centos7

[원문] http://boredguy.net/how-to-fix-nginx-502-bad-gateway-error-on-centosrhel/

포워딩이 정상적으로 톰켓으로 전달이 안되는 경우

다음과 같은방법으로 해결 가능 하다.

How to fix nginx 502 Bad Gateway error on CentOS/RHEL

I was trying to set up a reverse proxy for Atlassian Jira and Confluence by using nginx, connected to http://localhost:8080. This is the error I was getting in my logs:

2015/02/10 10:59:37 [crit] 21155#0: *12 connect() to 127.0.0.1:8080 failed (13: Permission denied) while connecting to upstream, client: a.b.c.d, server: x.y.z, request: "GET / HTTP/1.1", upstream: "http://127.0.0.1:8080/", host: "x.y.z"
2015/02/10 10:59:38 [error] 21155#0: *15 no live upstreams while connecting to upstream, client: a.b.c.d, server: x.y.z, request: "GET / HTTP/1.1", upstream: "http://localhost/", host: "x.y.z"

Turns out it was just a SELinux issue. I’ve fixed the problem by issuing this command:

setsebool -P httpd_can_network_connect 1

If you want, you can even completely disable SELinux this way:

sed -i s/SELINUX=enforcing/SELINUX=disabled/g /etc/selinux/config
This entry was posted in Atlassian, CentOS, nginx.
2015/05/08 01:34 2015/05/08 01:34
Posted
Filed under centos7
[원문] http://www.unixmen.com/configure-vsftpd-ssltls-centos-7/

 ftp접근시 22번 포트를 사용함

After installing vsftpd on CentOS 7 server, let us create a directory to store SSL certificates.

mkdir /etc/ssl/private

Then, create the certificate and key files using the following command:

openssl req -x509 -nodes -days 365 -newkey rsa:1024 -keyout /etc/ssl/private/vsftpd.pem -out /etc/ssl/private/vsftpd.pem

You’ll be asked to enter the series of questions such as Country, State Code, Email address, Organization name etc. Enter the details one by one. Here is my sample output:

 Generating a 1024 bit RSA private key
 ......++++++
 .............++++++
 writing new private key to '/etc/ssl/private/vsftpd.pem'
 -----
 You are about to be asked to enter information that will be incorporated
 into your certificate request.
 What you are about to enter is what is called a Distinguished Name or a DN.
 There are quite a few fields but you can leave some blank
 For some fields there will be a default value,
 If you enter '.', the field will be left blank.
 -----
 Country Name (2 letter code) [XX]:IN
 State or Province Name (full name) []:TN
 Locality Name (eg, city) [Default City]:Erode
 Organization Name (eg, company) [Default Company Ltd]:Unixmen
 Organizational Unit Name (eg, section) []:Technical
 Common Name (eg, your name or your server's hostname) []:server1.unixmen.local
 Email Address []:sk@unixmen.com

In the common name field, you can either use hostname or IP address of your vsftpd server.

Edit vsftpd configuration file /etc/vsftpd/vsftpd.conf,

vi /etc/vsftpd/vsftpd.conf

Add the following lines at the end:

ssl_enable=YES
allow_anon_ssl=NO
force_local_data_ssl=YES
force_local_logins_ssl=YES

ssl_tlsv1=YES
ssl_sslv2=NO
ssl_sslv3=NO

rsa_cert_file=/etc/ssl/private/vsftpd.pem
rsa_private_key_file=/etc/ssl/private/vsftpd.pem

Save and close the file. Restart vsftpd service.

systemctl restart vsftpd

Check FTP Server

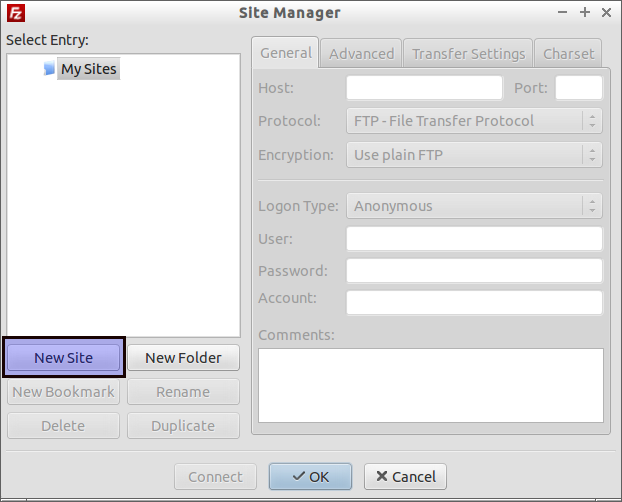
Open Filezilla from your client system. Go to File -> Site Manager.

In the Site Manager window, select New Site.

Site Manager_003

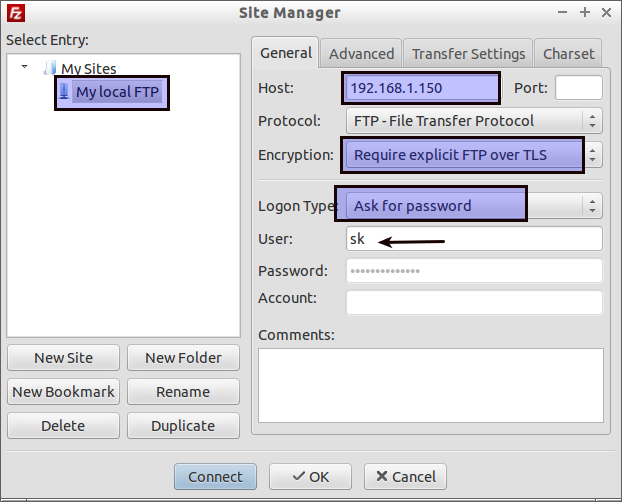
Name your new site, or leave it as it is. In my case I name it as My local FTP. Enter the FTP server IP address, and select “Require explicit FTP over TLS” from the Encryption drop down box. In the Logon Type drop downbox, select Ask for password option, and enter your FTP user name. Finally click on the Connect button.

Site Manager_004

You’ll be asked to enter the ftp user password in the next screen.

Enter password_007

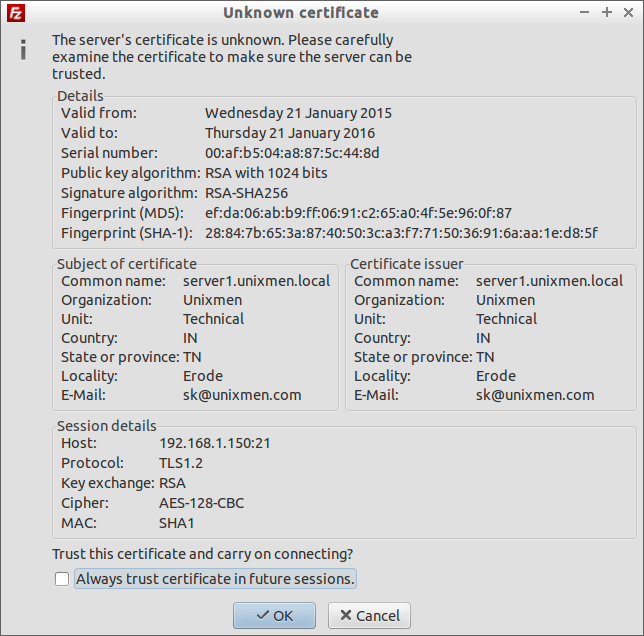
Now, you”ll be asked to accept the certificate that is being used to make sure the server can be trusted. In the Certificate window, you may see the list of values which is entered during the certificate generation process. Click Ok to accept the certificate and establish the connection.

Unknown certificate_008

That’s it. Now you’ll be able to access your FTP server.

My local Site - ftpes:--sk@192.168.1.150 - FileZilla_009

Note: if you keep getting the error “The data connection could not be established: EHOSTUNREACH – No route to host” after enabling SSL/TLS, disable iptables and try again.

That’s all for now. Cheers!

2015/05/08 00:31 2015/05/08 00:31
Posted
Filed under centos7
yum install vsftpd

vi /etc/vsftpd/vsftpd.conf


[root@www ~]#
yum -y install vsftpd
[root@www ~]#
vi /etc/vsftpd/vsftpd.conf

# line 12: no anonymous
anonymous_enable=NO
# line 82,83: uncomment ( allow ascii mode )

ascii_upload_enable=YES
ascii_download_enable=YES
# line 100, 101: uncomment ( enable chroot )

chroot_local_user=YES
chroot_list_enable=YES
# line 103: uncomment ( specify chroot list )

chroot_list_file=/etc/vsftpd/chroot_list
# line 109: uncomment

ls_recurse_enable=YES
# line 114: change ( if use IPv4 )

listen=
YES
# line 123: change ( turn to OFF if it's not need )

listen_ipv6=
NO
# add follows to the end

# specify root directory ( if don't specify, users' home directory become FTP home directory)

local_root=public_html
# use localtime

use_localtime=YES
# turn off for seccomp filter ( if you cannot login, add this line )

seccomp_sandbox=NO
[root@www ~]#
vi /etc/vsftpd/chroot_list
# add users you allow to move over their home directory

cent


2015/05/07 22:23 2015/05/07 22:23
Posted
Filed under centos7

방화벽 추가

firewall-cmd --permanent --zone=public --add-port=80/tcp

firewall-cmd --permanent --zone=public --add-port=8080/tcp

 firewall-cmd --permanent --zone=public --add-port=21/tcp

방화벽 확인

cat /etc/firewalld/zones/public.xml


방화벽 재시작

systemctl restart firewalld

2015/05/07 22:05 2015/05/07 22:05