/etc/yum.conf file and addhttp_caching=packages
yum clean all
yum makecache
yum update
blog.visualp.com

/etc/yum.conf file and add

If you receive an error while restarting IPtables on your virtual machine that includes : raw nat mangle filter [FAILED] or similar, this is a known error with CentOS 5 / CentOS 6 on virtual architectures. You simply need to modify the : /etc/init.d/iptables file.
===참고
https://www.hostvirtual.com/kb/6383/IPtables-returns-an-error--security-raw-nat-mangle-filter-FAILED.html
===
Next, locate the below text, you can search for 'setting chains' Next add the lines labeled with + to the file, after the line with: case "$i"
vi /etc/init.d/iptables
echo -n $"${IPTABLES}: Setting chains to policy $policy: "
ret=0
for i in $tables; do
echo -n "$i "
case "$i" in
<!-- 추가된 부분 -->
+ security)
+ $IPTABLES -t filter -P INPUT $policy \
+ && $IPTABLES -t filter -P OUTPUT $policy \
+ && $IPTABLES -t filter -P FORWARD $policy \
+ || let ret+=1
+ ;;
raw)
$IPTABLES -t raw -P PREROUTING $policy \
&& $IPTABLES -t raw -P OUTPUT $policy \
|| let ret+=1
;;
CENTOS 6.6 에 NGINX1.8 설치 해서 java 환경 세팅중
502 BAD GATEWay error 가 발생 한다.다음 2 명령어로 깔끔하게 해결 할 수 있다.
나와 같은 에러가 CentOS/RHEL 계열 OS에서 발생한다면 다음 두개의 명령으로 말끔히 해결!
setsebool -P httpd_can_network_connect 1
더욱더 견고하게! fix하고 싶다면...
sed -i s/SELINUX=enforcing/SELINUX=disabled/g /etc/selinux/config
I was trying to set up a reverse proxy for Atlassian Jira and Confluence by using nginx, connected to http://localhost:8080. This is the error I was getting in my logs:
2015/02/10 10:59:37 [crit] 21155#0: *12 connect() to 127.0.0.1:8080 failed (13: Permission denied) while connecting to upstream, client: a.b.c.d, server: x.y.z, request: "GET / HTTP/1.1", upstream: "http://127.0.0.1:8080/", host: "x.y.z"
2015/02/10 10:59:38 [error] 21155#0: *15 no live upstreams while connecting to upstream, client: a.b.c.d, server: x.y.z, request: "GET / HTTP/1.1", upstream: "http://localhost/", host: "x.y.z"
Turns out it was just a SELinux issue. I’ve fixed the problem by issuing this command:
setsebool -P httpd_can_network_connect 1
If you want, you can even completely disable SELinux this way:
sed -i s/SELINUX=enforcing/SELINUX=disabled/g /etc/selinux/config
After installing vsftpd on CentOS 7 server, let us create a directory to store SSL certificates.
mkdir /etc/ssl/private
Then, create the certificate and key files using the following command:
openssl req -x509 -nodes -days 365 -newkey rsa:1024 -keyout /etc/ssl/private/vsftpd.pem -out /etc/ssl/private/vsftpd.pem
You’ll be asked to enter the series of questions such as Country, State Code, Email address, Organization name etc. Enter the details one by one. Here is my sample output:
 Generating a 1024 bit RSA private key
 ......++++++
 .............++++++
 writing new private key to '/etc/ssl/private/vsftpd.pem'
 -----
 You are about to be asked to enter information that will be incorporated
 into your certificate request.
 What you are about to enter is what is called a Distinguished Name or a DN.
 There are quite a few fields but you can leave some blank
 For some fields there will be a default value,
 If you enter '.', the field will be left blank.
 -----
 Country Name (2 letter code) [XX]:IN
 State or Province Name (full name) []:TN
 Locality Name (eg, city) [Default City]:Erode
 Organization Name (eg, company) [Default Company Ltd]:Unixmen
 Organizational Unit Name (eg, section) []:Technical
 Common Name (eg, your name or your server's hostname) []:server1.unixmen.local
 Email Address []:sk@unixmen.com
In the common name field, you can either use hostname or IP address of your vsftpd server.
Edit vsftpd configuration file /etc/vsftpd/vsftpd.conf,
vi /etc/vsftpd/vsftpd.conf
Add the following lines at the end:
ssl_enable=YES
allow_anon_ssl=NO
force_local_data_ssl=YES
force_local_logins_ssl=YES

ssl_tlsv1=YES
ssl_sslv2=NO
ssl_sslv3=NO

rsa_cert_file=/etc/ssl/private/vsftpd.pem
rsa_private_key_file=/etc/ssl/private/vsftpd.pem
Save and close the file. Restart vsftpd service.
systemctl restart vsftpd
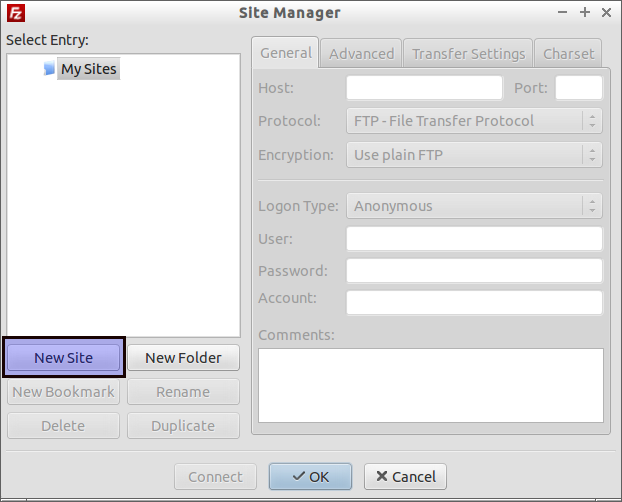
Open Filezilla from your client system. Go to File -> Site Manager.
In the Site Manager window, select New Site.
Name your new site, or leave it as it is. In my case I name it as My local FTP. Enter the FTP server IP address, and select “Require explicit FTP over TLS” from the Encryption drop down box. In the Logon Type drop downbox, select Ask for password option, and enter your FTP user name. Finally click on the Connect button.
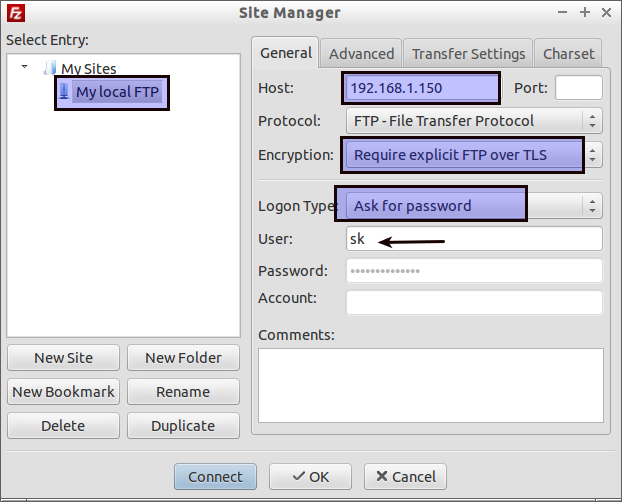
You’ll be asked to enter the ftp user password in the next screen.

Now, you”ll be asked to accept the certificate that is being used to make sure the server can be trusted. In the Certificate window, you may see the list of values which is entered during the certificate generation process. Click Ok to accept the certificate and establish the connection.
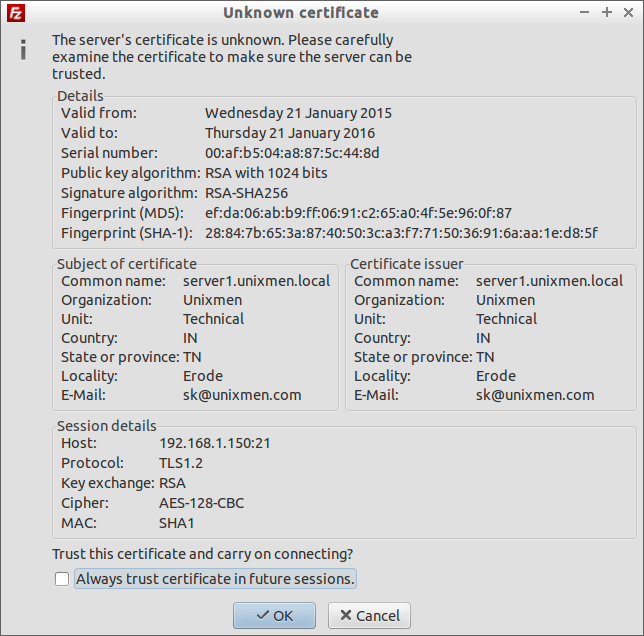
That’s it. Now you’ll be able to access your FTP server.

Note: if you keep getting the error “The data connection could not be established: EHOSTUNREACH – No route to host” after enabling SSL/TLS, disable iptables and try again.
That’s all for now. Cheers!
저장소 설치
sudo rpm -Uvh http://nginx.org/packages/centos/7/noarch/RPMS/nginx-release-centos-7-0.el7.ngx.noarch.rpm
yum을 통해 nginx 다운로드 및 설치
yum install nginx
자동으로 부팅 시 Nginx 서비스 실행
systemctl start nginx.service
방화벽 추가
firewall-cmd --permanent --zone=public --add-port=80/tcp
firewall-cmd --permanent --zone=public --add-port=8080/tcp
firewall-cmd --permanent --zone=public --add-port=21/tcp
방화벽 확인
cat /etc/firewalld/zones/public.xml
방화벽 재시작
systemctl restart firewalld